Integromat x Qonto: for automation experts

You’ve already seen how Zapier can help you automate your financial processes. Today, we would like to introduce you to Integromat.
Integromat is a powerful no-code tool that provides automation solutions via a visual interface, without you having to write a single line of code. By connecting it to Qonto, you can set up advanced automations that will make your life easier.
Keep reading to learn more about the multitude of possibilities that arise when Qonto and Integromat join forces. For those of you interested in getting started right away, scroll to the bottom for an exclusive tutorial!
Integromat: the expert no-code solution 👩💻
What is Integromat exactly? Integromat enables users to create scenarios to connect applications in order to enhance their capabilities and program automations, and all this without having to code.
As an added advantage, you can use it to take automation and customization to new heights. Let’s get technical for a moment: Integromat allows you to add an infinite number of steps, launch recurring jobs, complete iterative flows, and even store data. With Integromat, you can create the exact scenarios you need.
Simplifying your financial processes 🤩
So, where does Qonto fit into all of this? Our application joins the hundreds of tools linked to Integromat, which means you can use its multitude of connections to automate your financial processes. Connect Qonto to your everyday tools such as Uber, Gmail, Word, Dropbox and Trello. What advantages does this provide? Manual tasks are reduced to the bare minimum, and your financial management is greatly improved.
From there, you can build the integrations you need to simplify your life, based on your transaction data, your payment receipts or even your Qonto users. Let’s put things into context with some real-life examples of what you can do with this integration:
- Are you constantly commuting back and forth between home, the office and your meetings? Use an Integromat workflow to send you a summary of all your Uber payments at the end of the month. 🚕
- Create documents with the snap of your fingers and generate Word templates automatically to send an automated acknowledgement of receipt to your customers. 💡
- Keep your accountant happy by sending him or her an e-mail summary of all your monthly transactions automatically. 🧾
And what better way to illustrate how it works than by providing a real step-by-step demonstration?
Let's hear from the real experts — our users! 🤓
Francis Lelong is an entrepreneur and CEO of Alegria.tech, the first no-code agency in France, and also a Qonto customer.
Francis Lelong, CEO of Alegria.tech
Francis is a no-code expert. What’s more, he uses the Qonto application combined with Integromat on a daily basis at his own agency, thus saving him time and eliminating manual tasks. When it comes to no-code automation, we can count on him to share with you his best secrets. 😉
Re-invoice your customers automatically 🧾
One of his favorite uses is automated re-invoicing of his customers. With this helpful tip, any software or even Uber invoices added to Qonto can be subsequently re-invoiced to your customers automatically. Listen up all you freelancers, self-employed professionals and consulting agencies; this is for you!
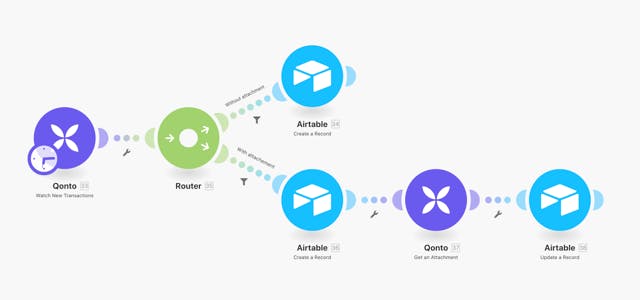
You should ultimately obtain this scenario:
To make it work, follow Francis’s exclusive recipe step by step!
- Start by adding your transaction receipts to Qonto via your web or mobile app.
- Using the Custom labels in the Qonto application, assign a customer to each expense, as needed, at the same time you are adding the receipt.
- From Integromat, retrieve all your Qonto transactions in Airtable. For this, use the Qonto Watch New Transactions module. You will then be able to integrate all your transactions as often as you want and apply a filter to view, for example, your expenses only.
- Continue your Integromat scenario for all transactions with an attachment using the Qonto Get an attachment module.
- On Airtable, if you used the Custom labels, they will be integrated using an item number rather than the label name directly. As a result, the List of label ID field will display in Airtable as “4a43eab2-5b94-49ef-9725-b2ae10275a9f” instead of your customer’s name, such as EDF for example. You will thus need to program a formula in your Airtable to convert the item number to the name of the customer you want to re-invoice for the expense.
- You will then have a table with all the expenses listed by customer and by month. All you need to do now is link each expense to your invoice table. A Rollup field with the SUM formula will give you a total of all the expenses for each customer. You can link your invoice lines to each expense manually or automatically with Integromat.
- Finally, once the invoice is validated (for example, by clicking on an Invoice validated checkbox), send it to your customer automatically using Gmail.
And voilà! That’s all there is to it.
Can you imagine how many Excel operations, downloads and personalized e-mails you can avoid with Integromat? Now it’s your turn! Click here and start automating all your operations.
